The beauty industry is constantly evolving, and one of the latest breakthroughs in eyebrow enhancement is nanoblading. This semi-permanent cosmetic technique has gained immense popularity due to its precision and ability to create natural-looking, fuller brows with long-lasting results. But what exactly is nanoblading, and why is it becoming the go-to solution for perfect brows? Arti Bagga, a celebrity microblading expert, recently visited Zennara Clinics in Jubilee Hills for a special three-day event, where she gave insights into why nanoblading stands out as a sophisticated and effective method for achieving flawless brows.
Nanoblading vs microblading
Microblading has been a widely favoured technique for restoring over-plucked brows, particularly for those who fell victim to the thin-brow trend of the ’90s. Alongside other eyebrow-enhancing methods like brow tinting and lamination, microblading has helped people achieve fuller brows.
“Microblading is a semi-permanent makeup procedure that enhances the appearance of eyebrows. It is performed using a disposable pen with ultra-fine needles to create natural, hair-like strokes,” explains Arti.
Before starting the procedure, Arti consults with clients to determine the ideal shape, size, and colour that best complement their face. A pigment matching the client’s natural hair colour and skin undertone is selected, and the brow area is cleansed and numbed for treatment. Unlike traditional tattooing, which uses a machine, microblading is performed manually with a handheld tool, resulting in a realistic, hair-like appearance. The results typically last between one to two years.
Nanoblading, on the other hand, follows the same process but utilises a much finer blade, creating even more delicate, wispy strokes for an ultra-natural finish. “Eyebrow trends have evolved over the years, with the full and fluffy look remaining timeless. Brooke Shields, famous for her thick, brushed-up brows, is a great example of a style that continues to be in high demand,” Arti notes.

Step-by-step process of a nanoblading session
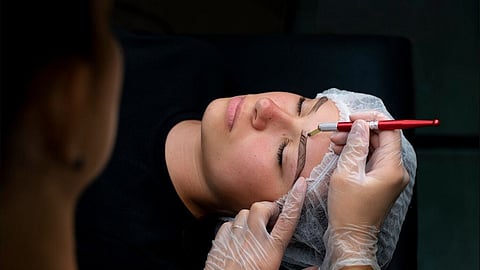
“First, I consult with the client to understand what she would like to enhance about her brows and advise on the best possible outcome. Then, I clean any excess stray hairs using either threading or shaving. A numbing cream is applied for 30 minutes, and during this time, we discuss the colour choice. I typically aim to match it as closely as possible to the client’s natural hair colour,” says Arti.
Once the numbing is complete, it’s time for the pre-draw. She first measures the symmetry points of the brows according to the eyes and brow bone, then outlines the shape using an eyebrow pencil. “Once we are satisfied with the shape, I begin the blading process. I lightly deposit the pigment onto the surface of the skin using hair-like strokes. This process is repeated a couple of times, with a halfway numbing gel applied throughout to ensure the client feels no discomfort. Finally, I apply a layer of pigment over the brows for
10 minutes to ensure even pigment distribution across all the strokes. The procedure is then complete, leaving the client with beautifully natural, fluffy brows,” explains Arti.
Before treatment, she recommend that clients avoid intense chemical peel facials, Botox around the brow area, tanning, and retinol products near the brows for at least two weeks. The microblading expert advises, “Aftercare is crucial for 7-14 days after the treatment to ensure perfectly healed results. A retouch is required between 6-12 weeks in case any pigment is lost during the healing process or if certain areas need additional filling.”
Who should avoid microblading?
According to Arti, microblading is generally safe for most people but is not recommended for individuals prone to keloid scarring, those on strong blood-thinning medication, or those who are pregnant. It is also not encouraged for individuals with autoimmune diseases that affect the skin’s healing process. “If you have sensitive skin or skin allergies, a patch test is recommended before undergoing the treatment,” says the expert.
On dealing with adjustments if the client is not satisfied with the outcome, she says, “So far, touch wood, I haven’t encountered this situation as I take a very natural approach to enhancing clients’ brows. However, if needed, the brows can be corrected or removed using either a laser or the saline solution technique.”
Aftercare
* On the first day, clean the brows with cotton pads soaked in water to remove any lymph and excess pigment a few times throughout the day
* Apply the provided healing balm twice a day for 7-10 days. Only a small amount should be used — do not overapply. The healing balm aids in proper healing and protects the brows from infection
* Avoid blood-thinning medication, vitamins, and alcohol for the first 24 hours
* Keep your brows dry for 14 days — be careful when washing your hair, and avoid water activities, spa treatments, and intense sweating
* No makeup on the treated area for at least 10 days, as it can interfere with healing and cause irritation
* The brows may feel itchy after a few days — do not rub or pick at any scabs